Jupyternaut (optional)#
Warning
These docs are out of date and may not reflect the current behavior of Jupyternaut. See jupyter-ai#1618 for details and progress.
Jupyternaut is a custom agent built for Jupyter AI.
It should be considered experimental. It can be installed optionally via:
pip install 'jupyter-ai[jupyternaut]'
or:
pip install jupyter-ai-jupyternaut
Optional features#
The core package enables Jupyternaut’s chat and notebook tools, and keeps
conversation memory in memory. Persistent conversation memory is available as an
optional extra on the jupyter-ai-jupyternaut package:
Note
These optional extras are new in jupyter-ai-jupyternaut 0.0.12. This is a
behavior change from previous versions, where persistent conversation memory was
enabled by default. It is now opt-in: enable it explicitly via the persistence
extra described below.
Extra |
Enables |
Without it |
|---|---|---|
|
Conversation memory persisted to a local SQLite database so it survives server restarts (via |
Conversation memory is kept only for the lifetime of the server process |
|
All optional runtime features. Currently this is the same as |
— |
For example, to install Jupyternaut with persistent conversation memory:
pip install 'jupyter-ai-jupyternaut[persistence]'
Model selection#
Jupyternaut supports a wide range of model providers and models. Access to the
various providers is provided through LiteLLM, which
provides universal access to over a thousand different LLMs. You can select the
model to be used in the chat interface from the Settings tab -> Jupyternaut Settings, where you can see the models by typing in a search string.
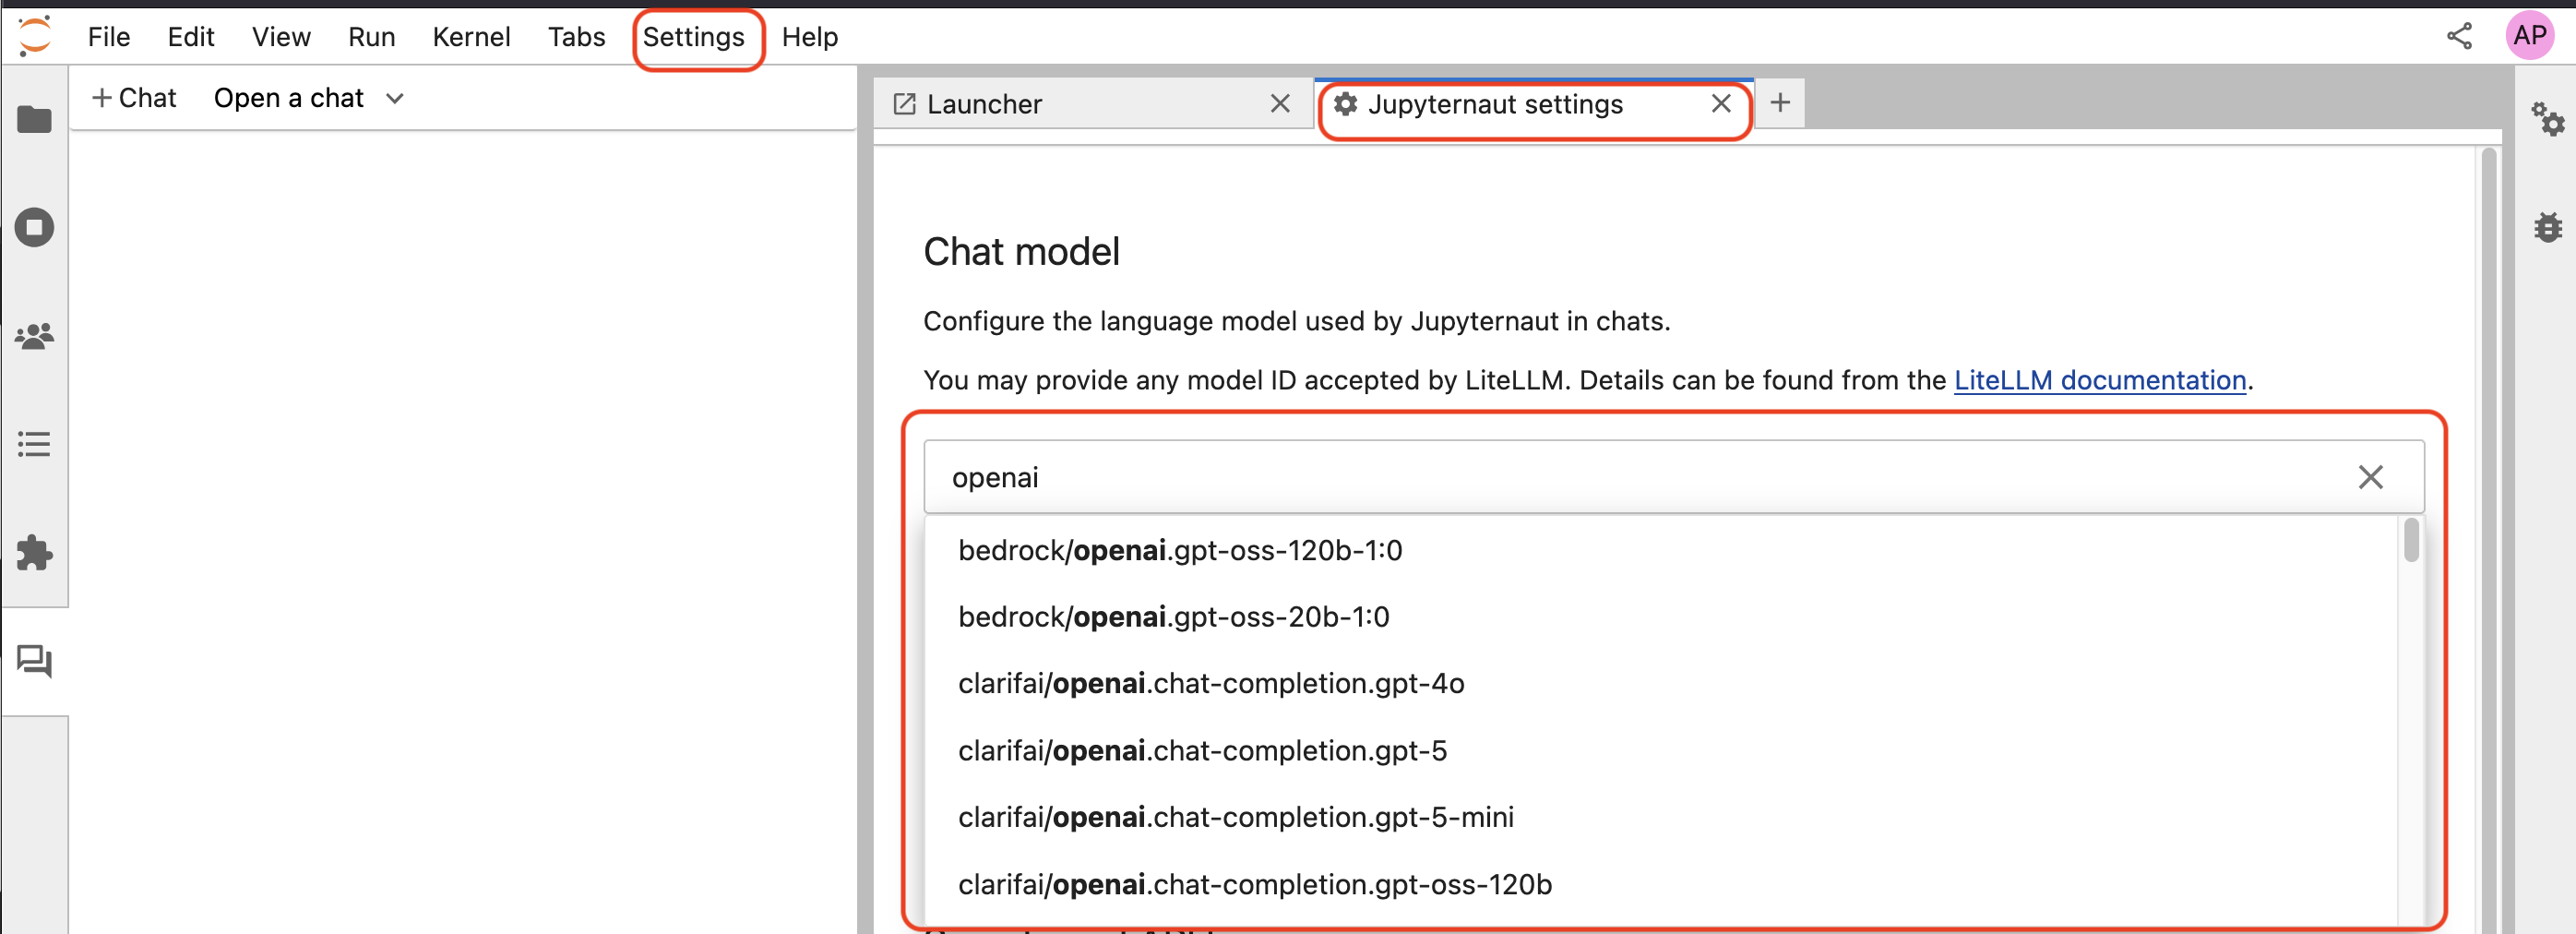
The LiteLLM interface does not show all available models and you can see the full list of providers and models online.
Each model that is added to the Custom models list will appear at the top of the model picker as shown here:

This ability to pick a custom model in Jupyternaut from a set of custom models instantiated by the user makes Jupyternaut multi-model. This means you can use multiple different AI models simultaneously within the Jupyternaut persona in the same chat thread.
To use Jupyter AI with a particular provider, you must set its API key (or other credentials) in the Jupyternaut settings, as needed. The names of the API keys are available from the LiteLLM documentation for each provider.
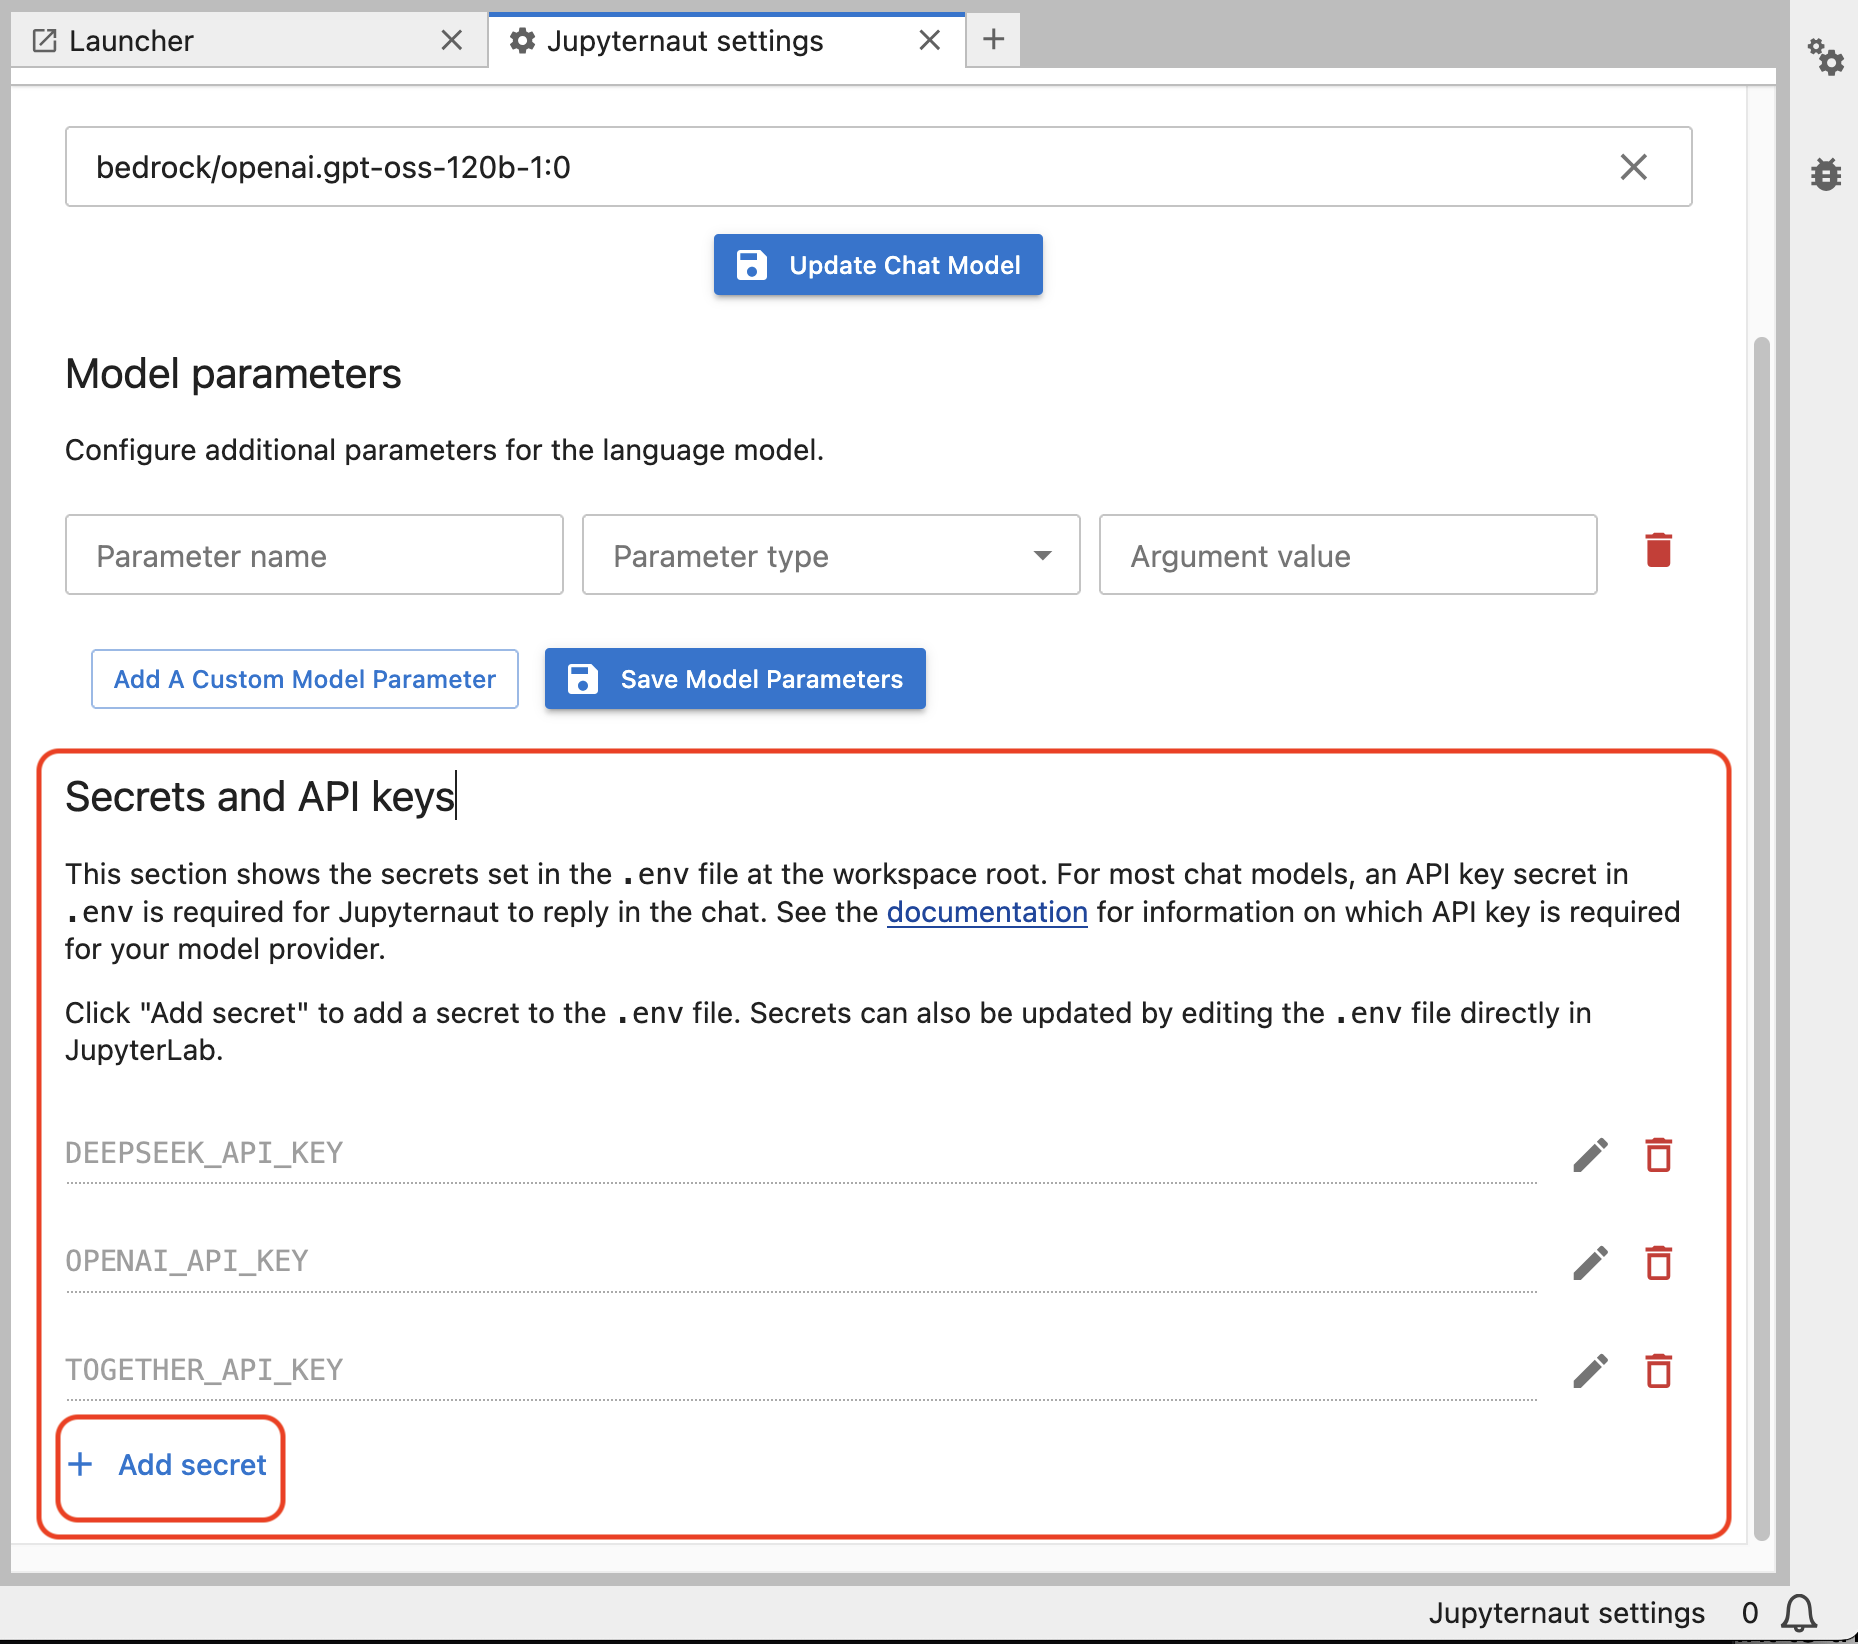
After saving the key, the model will be available for use in the chat interface.

In the same interface it is also possible to set model parameters. This is a new feature in v3. See the + Add Parameter button in the screenshots above.
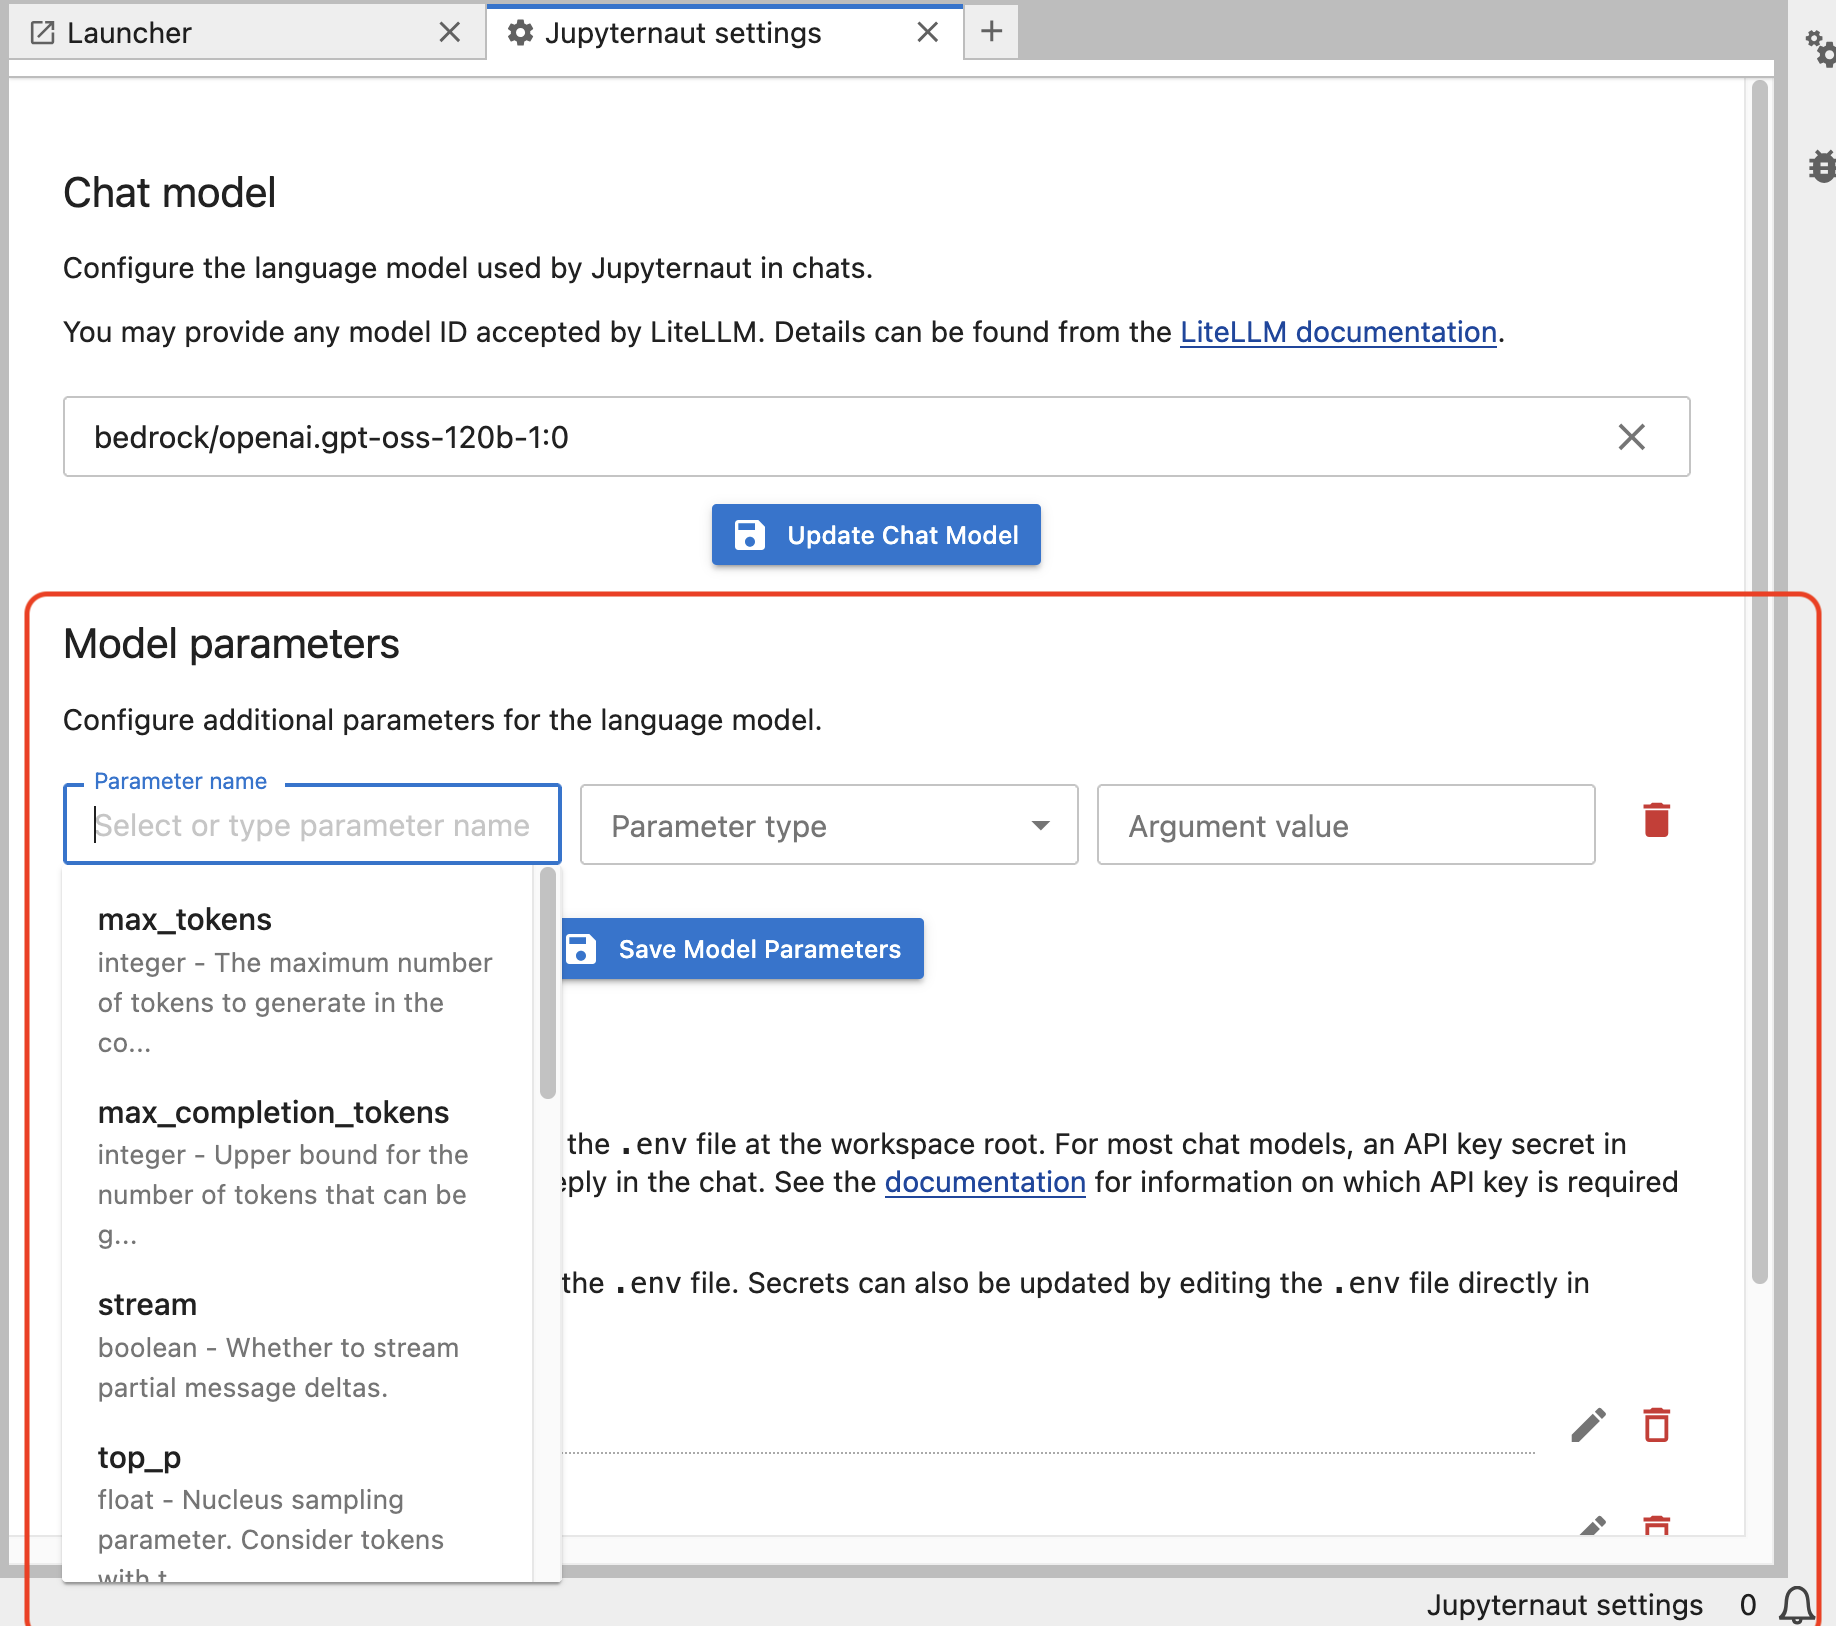
Thus each Jupyternaut custom model will be able to be parameterized as needed. Users can name these custom models in any way they wish to conform to their internal naming conventions, as needed.
Here are some examples of additional packages that may be installed as needed:
To use the Bedrock models, you need access to the Bedrock service, and you will need to authenticate via boto3, which also needs to be installed, as mentioned previously. For more information, see the Amazon Bedrock Homepage.
You need the
pillowPython package to use Hugging Face Hub’s text-to-image models.You can find a list of Hugging Face’s models at https://huggingface.co/models.
To use NVIDIA models, create a free account with the NVIDIA NGC service, which hosts AI solution catalogs, containers, models, and more. Navigate to Catalog > AI Foundation Models, and select a model with an API endpoint. Click “API” on the model’s detail page, and click “Generate Key”. Save this key, and set it as the environment variable
NVIDIA_API_KEYto access any of the model endpoints.SageMaker endpoint names are created when you deploy a model. For more information, see “Create your endpoint and deploy your model” in the SageMaker documentation. To use SageMaker’s models, you will also need to be authenticated via boto3.
Amazon Bedrock Usage#
Jupyternaut enables use of language models hosted on Amazon Bedrock on AWS. Ensure that you have authentication to use AWS using the boto3 SDK with credentials stored in the default profile. Guidance on how to do this can be found in the boto3 documentation.
For details on enabling model access in your AWS account, using cross-region inference, or invoking custom/provisioned models, please see our dedicated documentation page on using Amazon Bedrock in Jupyter AI.
OpenRouter and OpenAI Interface Usage#
Jupyternaut enables use of language models accessible through OpenRouter’s unified interface. Examples of models that may be accessed via OpenRouter are: Deepseek, Qwen, Mistral, etc. OpenRouter enables usage of any model conforming to the OpenAI API. In the Chat model area in Jupyternaut settings choose openrouter/ to see all the models from this provider.
Likewise, for many models, you may directly choose the OpenAI provider in Jupyter AI instead of OpenRouter in the same way. In the Chat model area in Jupyternaut settings choose openai/ to see all the models from this provider.
Ollama usage#
To get started, follow the instructions on the Ollama website to set up ollama and download the models locally. To select a model, enter the model name in the settings panel, for example deepseek-coder-v2. You can see all locally available models with ollama list in any terminal.
For the Ollama models to be available to JupyterLab-AI, your Ollama server must be running. You can check that this is the case by calling ollama serve at the terminal, and should see something like:
$ ollama serve
Error: listen tcp 127.0.0.1:11434: bind: address already in use
This indicates that Ollama is running on its default port number, 11434.
In some platforms (e.g. macOS or Windows), there may also be a graphical user interface or application that lets you start/stop the Ollama server from a menu.
By default, Ollama is served on 127.0.0.1:11434 (locally on port 11434), so Jupyter AI expects this by default. If you wish to use a remote Ollama server with a different IP address or a local Ollama server on a different port number, you have to configure this in advance.
To configure this in Jupyternaut settings, set the api_base paremeter field in the Model parameters section to your Ollama server’s custom IP address and port number:

To configure this in the magic commands, you should set the OLLAMA_HOST environment variable to the your Ollama server’s custom IP address and port number (assuming you chose 10000) in a new code cell:
%load_ext jupyter_ai_magics
os.environ["OLLAMA_HOST"] = "http://localhost:10000"
After running that cell, the AI magic command can then be used like so:
%%ai ollama:llama3.2
What is a transformer?
vLLM usage#
vLLM is a fast and easy-to-use library for LLM inference and serving. The vLLM website explains installation and usage. To use vLLM in Jupyter AI, please see the dedicated documentation page on using vLLM in Jupyter AI.
Configuration#
You can specify an allowlist, to only allow only a certain list of providers, or a blocklist, to block some providers.
Configuring default models and API keys#
This configuration allows for setting a default language and embedding models, and their corresponding API keys. These values are offered as a starting point for users, so they don’t have to select the models and API keys, however, the selections they make in the settings panel will take precedence over these values.
Specify default language model
jupyter lab --AiExtension.initial_language_model=bedrock/anthropic.claude-3-5-haiku-20241022-v1:0
Specify default API keys
jupyter lab --AiExtension.default_api_keys={'OPENAI_API_KEY': 'sk-abcd'}
Blocklisting providers#
This configuration allows for blocking specific providers in the settings panel. This list takes precedence over the allowlist in the next section.
jupyter lab --AiExtension.blocked_providers=openai
To block more than one provider in the block-list, repeat the runtime configuration.
jupyter lab --AiExtension.blocked_providers=openai --AiExtension.blocked_providers=ai21
Allowlisting providers#
This configuration allows for filtering the list of providers in the settings panel to only an allowlisted set of providers.
jupyter lab --AiExtension.allowed_providers=openai
To allow more than one provider in the allowlist, repeat the runtime configuration.
jupyter lab --AiExtension.allowed_providers=openai --AiExtension.allowed_providers=ai21
Chat memory size#
This configuration allows for setting the number of chat exchanges the model uses as context when generating a response.
One chat exchange corresponds to a user query message and its AI response, which counts as two messages. k denotes one chat exchange, i.e., two messages. The default value of k is 2, which corresponds to 4 messages.
For example, if we want the default memory to be 4 exchanges, then use the following command line invocation when starting Jupyter Lab:
jupyter lab --AiExtension.default_max_chat_history=4
Model parameters#
This configuration allows specifying arbitrary parameters that are unpacked and passed to the provider class. This is useful for passing parameters such as model tuning that affect the response generation by the model. This is also an appropriate place to pass in custom attributes required by certain providers/models.
The accepted value is a dictionary, with top level keys as the model id (provider:model_id), and value should be any arbitrary dictionary which is unpacked and passed as-is to the provider class.
Configuring as a startup option#
In this sample, the bedrock provider will be created with the value for
model_kwargs when bedrock/anthropic.claude-3-5-haiku-20241022-v1:0 model is selected.
jupyter lab --AiExtension.model_parameters bedrock/anthropic.claude-3-5-haiku-20241022-v1:0='{"model_kwargs":{"maxTokens":200}}'
Note the usage of single quotes surrounding the dictionary to escape the double quotes. This is required in some shells. The above will result in the following LLM class to be generated.
BedrockProvider(model_kwargs={"maxTokens":200}, ...)
Here is another example, where anthropic provider will be created with the
values for max_tokens and temperature, when bedrock/anthropic.claude-3-5-haiku-20241022-v1:0 model is selected.
jupyter lab --AiExtension.model_parameters bedrock/anthropic.claude-3-5-haiku-20241022-v1:0='{"max_tokens":1024,"temperature":0.9}'
The above will result in the following LLM class to be generated.
AnthropicProvider(max_tokens=1024, temperature=0.9, ...)
To pass multiple sets of model parameters for multiple models in the
command-line, you can append them as additional arguments to
--AiExtension.model_parameters, as shown below.
jupyter lab \
--AiExtension.model_parameters bedrock/anthropic.claude-3-5-haiku-20241022-v1:0='{"model_kwargs":{"maxTokens":200}}' \
--AiExtension.model_parameters openai/gpt-4.1='{"max_tokens":1024,"temperature":0.9}'
However, for more complex configuration, we highly recommend that you specify this in a dedicated configuration file. We will describe how to do so in the following section.
Configuring as a config file#
This configuration can also be specified in a config file in json format.
Here is an example for configuring the bedrock provider for bedrock/anthropic.claude-3-5-haiku-20241022-v1:0
model.
{
  "AiExtension": {
    "model_parameters": {
      "bedrock/anthropic.claude-3-5-haiku-20241022-v1:0": {
        "model_kwargs": {
          "maxTokens": 200
        }
      }
    }
  }
}
There are several ways to specify JupyterLab to pick this config.
The first option is to save this config in a file and specifying the filepath at startup using the --config or -c option.
jupyter lab --config <config-file-path>
The second option is to drop it in a location that JupyterLab scans for configuration files.
The file should be named jupyter_jupyter_ai_config.json in this case. You can find these paths by running jupyter --paths
command, and picking one of the paths from the config section.
Here is an example of running the jupyter --paths command.
(jupyter-ai-lab4) ➜ jupyter --paths
config:
    /opt/anaconda3/envs/jupyter-ai-lab4/etc/jupyter
    /Users/3coins/.jupyter
    /Users/3coins/.local/etc/jupyter
    /usr/3coins/etc/jupyter
    /etc/jupyter
data:
    /opt/anaconda3/envs/jupyter-ai-lab4/share/jupyter
    /Users/3coins/Library/Jupyter
    /Users/3coins/.local/share/jupyter
    /usr/local/share/jupyter
    /usr/share/jupyter
runtime:
    /Users/3coins/Library/Jupyter/runtime