Users#
Welcome to the user documentation for Jupyter AI.
If you are interested in contributing to Jupyter AI, please see our contributor’s guide.
If you would like to build applications that enhance Jupyter AI, please see the developer’s guide.
Prerequisites#
You can run Jupyter AI on any system that can run a supported Python version from 3.8 to 3.11, including recent Windows, macOS, and Linux versions.
If you use conda, you can install Python 3.11 in your environment by running:
conda install python=3.11
The jupyter_ai package, which provides the lab extension and user interface in
JupyterLab, depends on JupyterLab 4. If upgrading to JupyterLab 4 is not
possible in your environment, you should install jupyter_ai v1.x instead.
See “Installation” for more details.
You can install JupyterLab using pip or conda.
via
pip:
# change 4.0 to 3.0 if you need JupyterLab 3
pip install jupyterlab~=4.0
via
conda:
# change 4.0 to 3.0 if you need JupyterLab 3
conda config --add channels conda-forge
conda config --set channel_priority strict
conda install jupyterlab~=4.0
The jupyter_ai_magics package, which provides exclusively the IPython magics,
does not depend on JupyterLab or jupyter_ai. You can install
jupyter_ai_magics without installing jupyterlab or jupyter_ai.
If you have both jupyter_ai_magics and jupyter_ai installed, you should
have the same version of each, to avoid errors.
Jupyter AI internally uses Pydantic v1 and should work with either Pydantic
version 1 or version 2. For compatibility, developers using Pydantic V2
should import classes using the pydantic.v1 package. See the
LangChain Pydantic migration plan
for advice about how developers should use v1 to avoid mixing v1 and v2
classes in their code.
Installation#
Installation via pip#
To install the JupyterLab extension, you can run:
pip install jupyter-ai
The latest major version of jupyter-ai, v2, only supports JupyterLab 4. If you
need support for JupyterLab 3, you should install jupyter-ai v1 instead:
pip install jupyter-ai~=1.0
If you are not using JupyterLab and you only want to install the Jupyter AI %%ai magic, you can run:
$ pip install jupyter-ai-magics
jupyter-ai depends on jupyter-ai-magics, so installing jupyter-ai
automatically installs jupyter-ai-magics.
Installation via pip or conda in a Conda environment (recommended)#
We highly recommend installing both JupyterLab and Jupyter AI within an isolated Conda environment to avoid clobbering Python packages in your existing Python environment.
First, install conda and create an environment that uses Python 3.11:
$ conda create -n jupyter-ai python=3.11
$ conda activate jupyter-ai
Then, use conda to install JupyterLab and Jupyter AI in this Conda environment.
$ conda install -c conda-forge jupyter-ai  # or,
$ conda install conda-forge::jupyter-ai
When starting JupyterLab with Jupyter AI, make sure to activate the Conda environment first:
conda activate jupyter-ai
jupyter lab
Uninstallation#
If you installed Jupyter AI using pip, to remove the extension, run:
$ pip uninstall jupyter-ai
or
$ pip uninstall jupyter-ai-magics
If you installed Jupyter AI using conda, you can remove it by running:
$ conda remove jupyter-ai
or
$ conda remove jupyter-ai-magics
Model providers#
Jupyter AI supports a wide range of model providers and models. To use Jupyter AI with a particular provider, you must install its Python packages and set its API key (or other credentials) in your environment or in the chat interface.
Jupyter AI supports the following model providers:
Provider |
Provider ID |
Environment variable(s) |
Python package(s) |
|---|---|---|---|
AI21 |
|
|
|
Anthropic |
|
|
|
Anthropic (chat) |
|
|
|
Bedrock |
|
N/A |
|
Bedrock (chat) |
|
N/A |
|
Cohere |
|
|
|
ERNIE-Bot |
|
|
|
Gemini |
|
|
|
GPT4All |
|
N/A |
|
Hugging Face Hub |
|
|
|
NVIDIA |
|
|
|
OpenAI |
|
|
|
OpenAI (chat) |
|
|
|
SageMaker |
|
N/A |
|
The environment variable names shown above are also the names of the settings keys used when setting up the chat interface. If multiple variables are listed for a provider, all must be specified.
To use the Bedrock models, you need access to the Bedrock service. For more information, see the Amazon Bedrock Homepage.
To use Bedrock models, you will need to authenticate via boto3.
You need the pillow Python package to use Hugging Face Hub’s text-to-image models.
You can find a list of Hugging Face’s models at https://huggingface.co/models.
To use NVIDIA models, create a free account with the NVIDIA NGC service, which hosts AI solution catalogs, containers, models, and more. Navigate to Catalog > AI Foundation Models, and select a model with an API endpoint. Click “API” on the model’s detail page, and click “Generate Key”. Save this key, and set it as the environment variable NVIDIA_API_KEY to access any of the model endpoints.
SageMaker endpoint names are created when you deploy a model. For more information, see “Create your endpoint and deploy your model” in the SageMaker documentation.
To use SageMaker’s models, you will need to authenticate via boto3.
For example, to use OpenAI models, use the chat interface settings panel to choose the OpenAI language model:
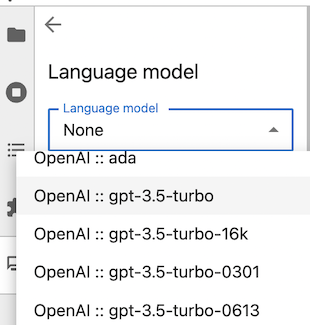
Then, enter your API key in the ‘API Keys’ section.
Attention
Model providers may charge users for API usage. Jupyter AI users are responsible for all charges they incur when they make API requests. Review your model provider’s pricing information before submitting requests via Jupyter AI.
The chat interface#
The easiest way to get started with Jupyter AI is to use the chat interface.
Attention
The chat interface sends data to generative AI models hosted by third parties. Please review your model provider’s privacy policy to understand how it may use the data you send to it. Review its pricing model so that you understand your payment obligations when using the chat interface.
Once you have started JupyterLab, click the new “chat” icon in the left side panel to open the chat interface. You can right-click on the panel icon and move it to the other side, if you prefer.

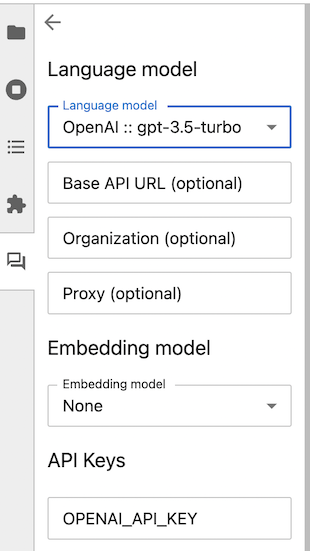
The first time you open the chat interface, Jupyter AI will ask you which models you want to use as a language model and as an embedding model. Once you have made your selections, the UI may display text boxes for one or more settings keys.
Language models and embedding models
Users may select a language model and, optionally, an embedding model. You should select one of each so that you can use the full functionality of the chat interface.
A language model responds to users’ messages in the chat panel. It accepts a prompt and produces a response. Language models are typically pre-trained; they are ready to use, but their training sets are biased and incomplete, and users need to be aware of their biases when they use the chat interface.
An embedding model is used when learning and asking about local data. These models can transform your data, including documents and source code files, into vectors that can help Jupyter AI compose prompts to language models.
Your language model and your embedding model do not need to be provided by the same vendor, but you will need authentication credentials for each model provider that you use.
Before you can use the chat interface, you need to provide your API keys for the model providers that you have selected. Paste or type your keys into the boxes provided.
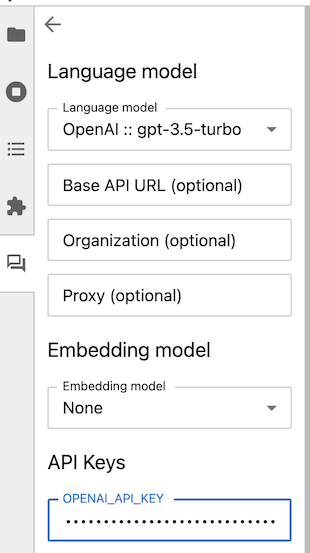
Once you have set all the necessary keys, click the “back” (left arrow) button in the upper-left corner of the Jupyter AI side panel. The chat interface now appears, and you can ask a question using the message box at the bottom.
![]()
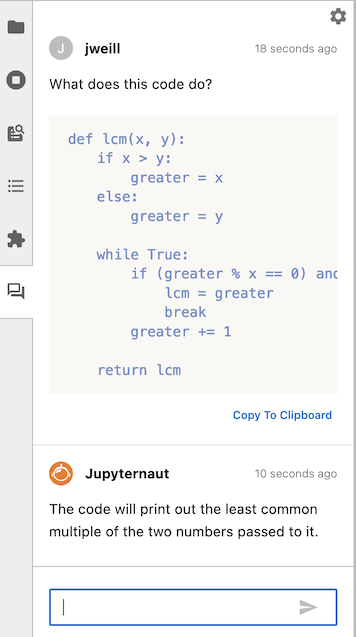
To compose a message, type it in the text box at the bottom of the chat interface and press ENTER to send it. You can press SHIFT+ENTER to add a new line. (These are the default keybindings; you can change them in the chat settings pane.) Once you have sent a message, you should see a response from Jupyternaut, the Jupyter AI chatbot.
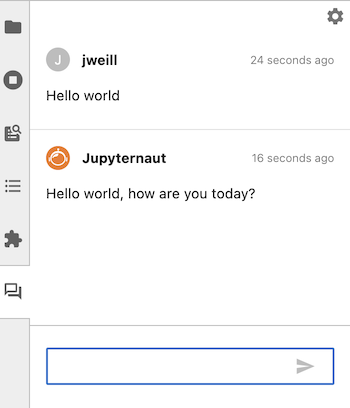
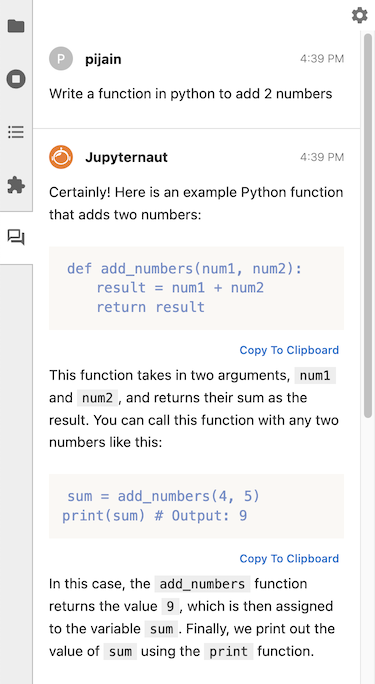
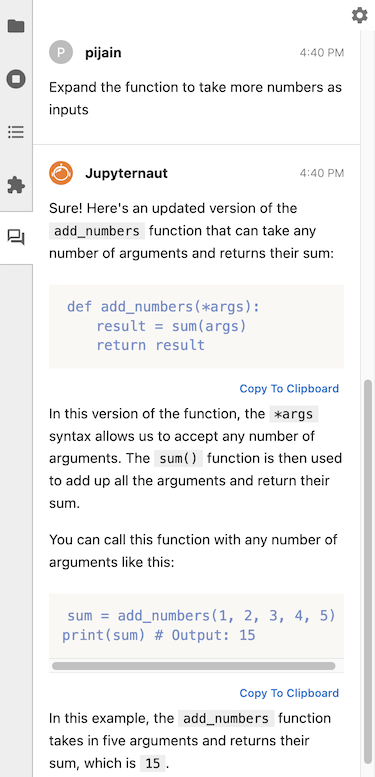
The chat backend remembers the last two exchanges in your conversation and passes them to the language model. You can ask follow up questions without repeating information from your previous conversations. Here is an example of a chat conversation with a follow up question:
Initial question#
Follow-up question#
SageMaker endpoints usage#
Jupyter AI supports language models hosted on SageMaker endpoints that use JSON
schemas. The first step is to authenticate with AWS via the boto3 SDK and have
the credentials stored in the default profile. Guidance on how to do this can
be found in the
boto3 documentation.
When selecting the SageMaker provider in the settings panel, you will see the following interface:
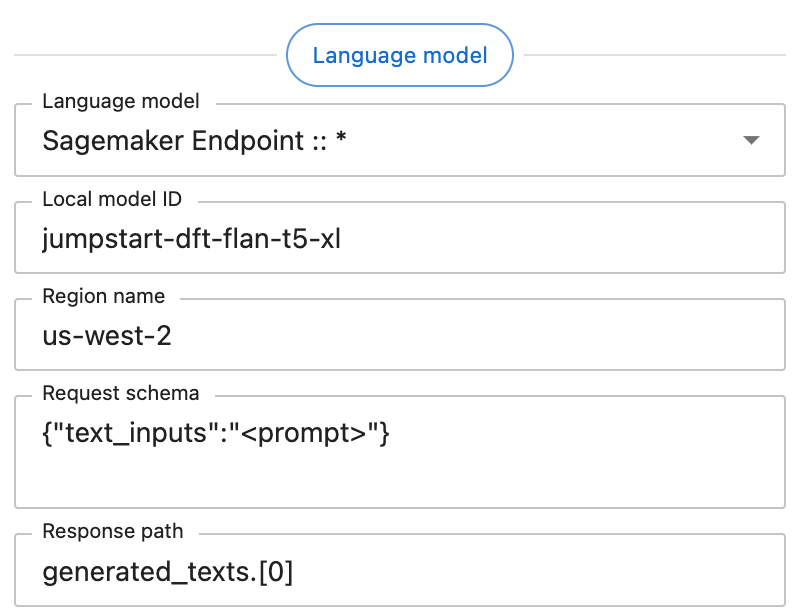
Each of the additional fields under “Language model” is required. These fields should contain the following data:
Endpoint name: The name of your endpoint. This can be retrieved from the AWS Console at the URL
https://<region>.console.aws.amazon.com/sagemaker/home?region=<region>#/endpoints.Region name: The AWS region your SageMaker endpoint is hosted in, such as
us-west-2.Request schema: The JSON object the endpoint expects, with the prompt being substituted into any value that matches the string literal
"<prompt>". In this example, the request schema{"text_inputs":"<prompt>"}generates a JSON object with the prompt stored under thetext_inputskey.Response path: A JSONPath string that retrieves the language model’s output from the endpoint’s JSON response. In this example, the endpoint returns an object with the schema
{"generated_texts":["<output>"]}, hence the response path isgenerated_texts.[0].
GPT4All usage (early-stage)#
Currently, we offer experimental support for GPT4All. To get started, first decide which models you will use. We currently offer the following models from GPT4All:
Model name |
Model size |
Model bin URL |
|---|---|---|
|
7.6 GB |
|
|
3.8 GB |
|
|
3.8 GB |
|
|
3.8 GB |
|
|
3.8 GB |
|
|
3.9 GB |
|
|
6.9 GB |
|
|
6.9 GB |
|
|
6.9 GB |
|
|
3.5 GB |
|
|
1.8 GB |
|
|
8.4 GB |
|
|
3.6 GB |
|
|
44 MB |
|
|
3.8 GB |
|
Note that each model comes with its own license, and that users are themselves responsible for verifying that their usage complies with the license. You can find licensing details on the GPT4All official site.
First, create a folder to store the model files.
mkdir ~/.cache/gpt4all
For each model you use, you will have to run the command
curl -LO --output-dir ~/.cache/gpt4all "<model-bin-url>"
, where <model-bin-url> should be substituted with the corresponding URL
hosting the model binary (within the double quotes). After restarting the
server, the GPT4All models installed in the previous step should be available to
use in the chat interface.
GPT4All support is still an early-stage feature, so some bugs may be encountered during usage. Our team is still actively improving support for locally-hosted models.
Asking about something in your notebook#
Jupyter AI’s chat interface can include a portion of your notebook in your prompt.
Warning
When you choose to include the selection with your message, this may increase the number of tokens in your request, which may cause your request to cost more money. Review your model provider’s cost policy before making large requests.
After highlighting a portion of your notebook, check “Include selection” in the chat panel, type your message, and then send your message. Your outgoing message will include your selection.
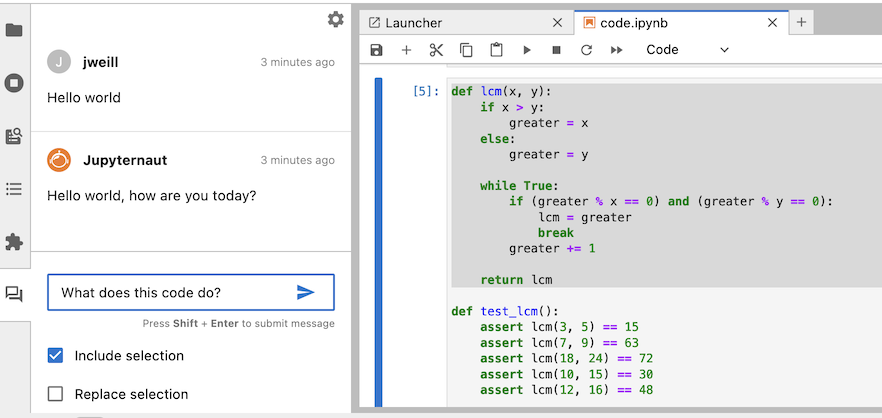
Below your message, you will see Jupyternaut’s response.
You can copy Jupyternaut’s response to the clipboard so that you can paste it into your notebook, or into any other application. You can also choose to replace the selection with Jupyternaut’s response by clicking “Replace selection” before you send your message.
Warning
When you replace your selection, data is written immediately after Jupyter AI sends its response to your message. Review any generated code carefully before you run it.
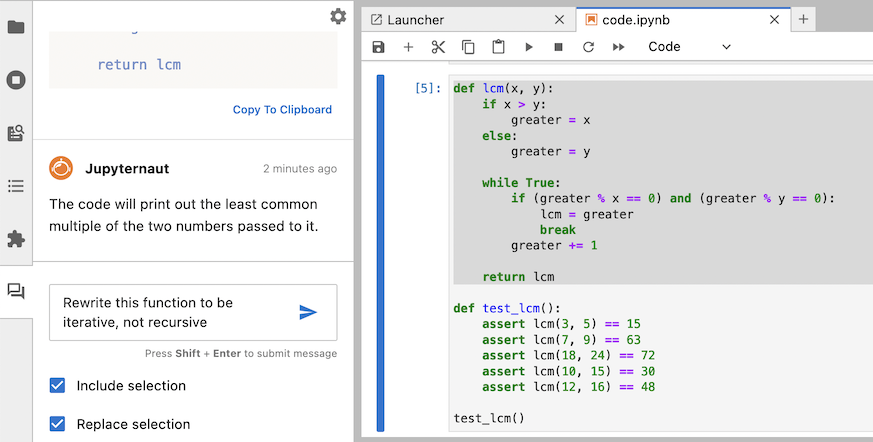
After Jupyternaut sends a response, your notebook will be updated immediately with the response replacing the selection. You can also see the response in the chat panel.
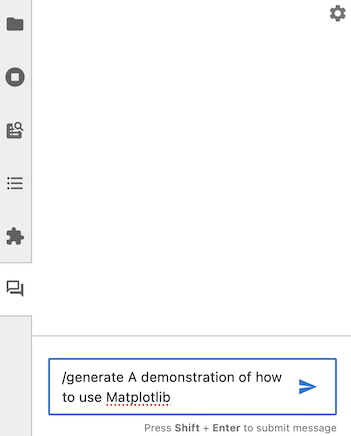
Generating a new notebook#
You can use Jupyter AI to generate an entire notebook from a text prompt. To get started, open the chat panel, and send it a message starting with /generate.
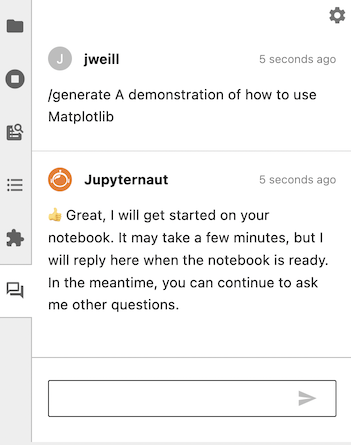
Generating a notebook can take a substantial amount of time, so Jupyter AI will respond to your message immediately while it works. You can continue to ask it other questions in the meantime.
Note
Especially if your prompt is detailed, it may take several minutes to generate your notebook. During this time, you can still use JupyterLab and Jupyter AI as you would normally. Do not shut your JupyterLab instance down while Jupyter AI is working.
When Jupyter AI is done generating your notebook, it will send you another message with the filename that it generated. You can then open this file using the file browser.
Warning
Generated notebooks may contain errors and may have unintended side effects when you run the code contained in them. Please review all generated code carefully before you run it.
Learning about local data#
Using the /learn command, you can teach Jupyter AI about local data so that Jupyternaut can include it when answering your questions. This local data is embedded using the embedding model you selected in the settings panel.
Warning
If you are using an embedding model hosted by a third party, please review your model provider’s policies before sending any confidential, sensitive, or privileged data to your embedding model.
To teach Jupyter AI about a folder full of documentation, for example, run /learn docs/. You will receive a response when Jupyter AI has indexed this documentation in a local vector database.
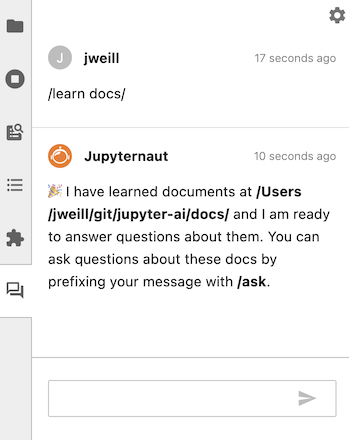
You can then use /ask to ask a question specifically about the data that you taught Jupyter AI with /learn.

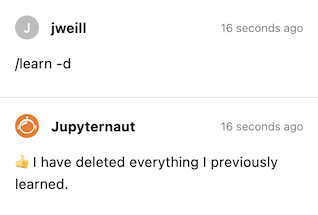
To clear the local vector database, you can run /learn -d and Jupyter AI will forget all information that it learned from your /learn commands.
With the /learn command, some models work better with custom chunk size and chunk overlap values. To override the defaults,
use the -c or --chunk-size option and the -o or --chunk-overlap option.
# default chunk size and chunk overlap
/learn <directory>

# chunk size of 500, and chunk overlap of 50
/learn -c 500 -o 50 <directory>

# chunk size of 1000, and chunk overlap of 200
/learn --chunk-size 1000 --chunk-overlap 200 <directory>
By default, /learn will not read directories named node_modules, lib, or build,
and will not read hidden files or hidden directories, where the file or directory name
starts with a .. To force /learn to read all supported file types in all directories,
use the -a or --all-files option.
# do not learn from hidden files, hidden directories, or node_modules, lib, or build directories
/learn <directory>

# learn from all supported files
/learn -a <directory>
Additional chat commands#
To clear the chat panel, use the /clear command. This does not reset the AI model; the model may still remember previous messages that you sent it, and it may use them to inform its responses.
The %ai and %%ai magic commands#
Jupyter AI can also be used in notebooks via Jupyter AI magics. This section provides guidance on how to use Jupyter AI magics effectively. The examples in this section are based on the Jupyter AI example notebooks.
If you already have jupyter_ai installed, the magics package
jupyter_ai_magics is installed automatically. Otherwise, run
pip install jupyter_ai_magics
in your terminal to install the magics package.
Before you send your first prompt to an AI model, load the IPython extension by running the following code in a notebook cell or IPython shell:
%load_ext jupyter_ai_magics
This command should not produce any output.
Note
If you are using remote kernels, such as in Amazon SageMaker Studio, the above
command will throw an error. You will need to install the magics package
on your remote kernel separately, even if you already have jupyter_ai_magics
installed in your server’s environment. In a notebook, run
%pip install jupyter_ai_magics
and re-run %load_ext jupyter_ai_magics.
Once the extension has loaded, you can run %%ai cell magic commands and
%ai line magic commands. Run %%ai help or %ai help for help with syntax.
You can also pass --help as an argument to any line magic command (for example,
%ai list --help) to learn about what the command does and how to use it.
Choosing a provider and model#
The %%ai cell magic allows you to invoke a language model of your choice with
a given prompt. The model is identified with a global model ID, which is a string with the
syntax <provider-id>:<local-model-id>, where <provider-id> is the ID of the
provider and <local-model-id> is the ID of the model scoped to that provider.
The prompt begins on the second line of the cell.
For example, to send a text prompt to the provider anthropic and the model ID
claude-v1.2, enter the following code into a cell and run it:
%%ai anthropic:claude-v1.2
Write a poem about C++.
We currently support the following language model providers:
ai21anthropicanthropic-chatbedrockbedrock-chatcoherehuggingface_hubnvidia-chatopenaiopenai-chatsagemaker-endpoint
Listing available models#
Jupyter AI also includes multiple subcommands, which may be invoked via the
%ai line magic. Jupyter AI uses subcommands to provide additional utilities
in notebooks while keeping the same concise syntax for invoking a language model.
The %ai list subcommand prints a list of available providers and models. Some
providers explicitly define a list of supported models in their API. However,
other providers, like Hugging Face Hub, lack a well-defined list of available
models. In such cases, it’s best to consult the provider’s upstream
documentation. The Hugging Face website includes a
list of models, for example.
Optionally, you can specify a provider ID as a positional argument to %ai list
to get all models provided by one provider. For example, %ai list openai will
display only models provided by the openai provider.
Abbreviated syntax#
If your model ID is associated with only one provider, you can omit the provider-id and
the colon from the first line. For example, because ai21 is the only provider of the
j2-jumbo-instruct model, you can either give the full provider and model,
%%ai ai21:j2-jumbo-instruct
Write some JavaScript code that prints "hello world" to the console.
or just the model,
%%ai j2-jumbo-instruct # infers AI21 provider
Write some JavaScript code that prints "hello world" to the console.
Formatting the output#
By default, Jupyter AI assumes that a model will output markdown, so the output of
an %%ai command will be formatted as markdown by default. You can override this
using the -f or --format argument to your magic command. Valid formats include:
codeimage(for Hugging Face Hub’s text-to-image models only)markdownmathhtmljsontext
For example, to force the output of a command to be interpreted as HTML, you can run:
%%ai anthropic:claude-v1.2 -f html
Create a square using SVG with a black border and white fill.
The following cell will produce output in IPython’s Math format, which in a web browser
will look like properly typeset equations.
%%ai chatgpt -f math
Generate the 2D heat equation in LaTeX surrounded by `$$`. Do not include an explanation.
This prompt will produce output as a code cell below the input cell.
Warning
Please review any code that a generative AI model produces before you run it or distribute it. The code that you get in response to a prompt may have negative side effects and may include calls to nonexistent (hallucinated) APIs.
%%ai chatgpt -f code
A function that computes the lowest common multiples of two integers, and
a function that runs 5 test cases of the lowest common multiple function
Interpolating in prompts#
Using curly brace syntax, you can include variables and other Python expressions in your prompt. This lets you execute a prompt using code that the IPython kernel knows about, but that is not in the current cell.
For example, we can set a variable in one notebook cell:
poet = "Walt Whitman"
Then, we can use this same variable in an %%ai command in a later cell:
%%ai chatgpt
Write a poem in the style of {poet}
When this cell runs, {poet} is interpolated as Walt Whitman, or as whatever poet
is assigned to at that time.
You can use the special In and Out list with interpolation syntax to explain code
located elsewhere in a Jupyter notebook. For example, if you run the following code in
a cell, and its input is assigned to In[11]:
for i in range(0, 5):
  print(i)
You can then refer to In[11] in an %%ai magic command, and it will be replaced
with the code in question:
%%ai cohere:command-xlarge-nightly
Please explain the code below:
--
{In[11]}
You can also refer to the cell’s output using the special Out list, with the same index.
%%ai cohere:command-xlarge-nightly
Write code that would produce the following output:
--
{Out[11]}
Jupyter AI also adds the special Err list, which uses the same indexes as In and Out.
For example, if you run code in In[3] that produces an error, that error is captured in
Err[3] so that you can request an explanation using a prompt such as:
%%ai chatgpt
Explain the following Python error:
--
{Err[3]}
The AI model that you use will then attempt to explain the error. You could also write a
prompt that uses both In and Err to attempt to get an AI model to correct your code:
%%ai chatgpt --format code
The following Python code:
--
{In[3]}
--
produced the following Python error:
--
{Err[3]}
--
Write a new version of this code that does not produce that error.
As a shortcut for explaining errors, you can use the %ai error command, which will explain the most recent error using the model of your choice.
%ai error anthropic:claude-v1.2
Creating and managing aliases#
You can create an alias for a model using the %ai register command. For example, the command:
%ai register claude anthropic:claude-v1.2
will register the alias claude as pointing to the anthropic provider’s claude-v1.2 model. You can then use this alias as you would use any other model name:
%%ai claude
Write a poem about C++.
You can also define a custom LangChain chain:
from langchain.chains import LLMChain
from langchain.prompts import PromptTemplate
from langchain.llms import OpenAI

llm = OpenAI(temperature=0.9)
prompt = PromptTemplate(
    input_variables=["product"],
    template="What is a good name for a company that makes {product}?",
)
chain = LLMChain(llm=llm, prompt=prompt)
… and then use %ai register to give it a name:
%ai register companyname chain
You can change an alias’s target using the %ai update command:
%ai update claude anthropic:claude-instant-v1.0
You can delete an alias using the %ai delete command:
%ai delete claude
You can see a list of all aliases by running the %ai list command.
Aliases’ names can contain ASCII letters (uppercase and lowercase), numbers, hyphens, underscores, and periods. They may not contain colons. They may also not override built-in commands — run %ai help for a list of these commands.
Aliases must refer to models or LLMChain objects; they cannot refer to other aliases.
Using magic commands with SageMaker endpoints#
You can use magic commands with models hosted using Amazon SageMaker.
First, make sure that you’ve set your AWS_ACCESS_KEY_ID and AWS_SECRET_ACCESS_KEY environment variables either before starting JupyterLab or using the %env magic command within JupyterLab. For more information about environment variables, see Environment variables to configure the AWS CLI in AWS’s documentation.
Jupyter AI supports language models hosted on SageMaker endpoints that use JSON schemas. Authenticate with AWS via the boto3 SDK and have the credentials stored in the default profile. Guidance on how to do this can be found in the boto3 documentation.
You will need to deploy a model in SageMaker, then provide it as the model name (as sagemaker-endpoint:my-model-name). See the documentation on how to deploy a JumpStart model.
All SageMaker endpoint requests require you to specify the --region-name, --request-schema, and --response-path options. The example below presumes that you have deployed a model called jumpstart-dft-hf-text2text-flan-t5-xl.
%%ai sagemaker-endpoint:jumpstart-dft-hf-text2text-flan-t5-xl --region-name=us-east-1 --request-schema={"text_inputs":"<prompt>"} --response-path=generated_texts.[0] -f code
Write Python code to print "Hello world"
The --region-name parameter is set to the AWS region code where the model is deployed, which in this case is us-east-1.
The --request-schema parameter is the JSON object the endpoint expects as input, with the prompt being substituted into any value that matches the string literal "<prompt>". For example, the request schema {"text_inputs":"<prompt>"} will submit a JSON object with the prompt stored under the text_inputs key.
The --response-path option is a JSONPath string that retrieves the language model’s output from the endpoint’s JSON response. For example, if your endpoint returns an object with the schema {"generated_texts":["<output>"]}, its response path is generated_texts.[0].
Configuration#
You can specify an allowlist, to only allow only a certain list of providers, or a blocklist, to block some providers.
Configuring default models and API keys#
This configuration allows for setting a default language and embedding models, and their corresponding API keys. These values are offered as a starting point for users, so they don’t have to select the models and API keys, however, the selections they make in the settings panel will take precedence over these values.
Specify default language model
jupyter lab --AiExtension.default_language_model=bedrock-chat:anthropic.claude-v2
Specify default embedding model
jupyter lab --AiExtension.default_embeddings_model=bedrock:amazon.titan-embed-text-v1
Specify default API keys
jupyter lab --AiExtension.default_api_keys={'OPENAI_API_KEY': 'sk-abcd'}
Blocklisting providers#
This configuration allows for blocking specific providers in the settings panel. This list takes precedence over the allowlist in the next section.
jupyter lab --AiExtension.blocked_providers=openai
To block more than one provider in the block-list, repeat the runtime configuration.
jupyter lab --AiExtension.blocked_providers=openai --AiExtension.blocked_providers=ai21
Allowlisting providers#
This configuration allows for filtering the list of providers in the settings panel to only an allowlisted set of providers.
jupyter lab --AiExtension.allowed_providers=openai
To allow more than one provider in the allowlist, repeat the runtime configuration.
jupyter lab --AiExtension.allowed_providers=openai --AiExtension.allowed_providers=ai21
Model parameters#
This configuration allows specifying arbitrary parameters that are unpacked and passed to the provider class. This is useful for passing parameters such as model tuning that affect the response generation by the model. This is also an appropriate place to pass in custom attributes required by certain providers/models.
The accepted value is a dictionary, with top level keys as the model id (provider:model_id), and value should be any arbitrary dictionary which is unpacked and passed as-is to the provider class.
Configuring as a startup option#
In this sample, the bedrock provider will be created with the value for
model_kwargs when ai21.j2-mid-v1 model is selected.
jupyter lab --AiExtension.model_parameters bedrock:ai21.j2-mid-v1='{"model_kwargs":{"maxTokens":200}}'
Note the usage of single quotes surrounding the dictionary to escape the double quotes. This is required in some shells. The above will result in the following LLM class to be generated.
BedrockProvider(model_kwargs={"maxTokens":200}, ...)
Here is another example, where anthropic provider will be created with the
values for max_tokens and temperature, when claude-2 model is selected.
jupyter lab --AiExtension.model_parameters anthropic:claude-2='{"max_tokens":1024,"temperature":0.9}'
The above will result in the following LLM class to be generated.
AnthropicProvider(max_tokens=1024, temperature=0.9, ...)
To pass multiple sets of model parameters for multiple models in the
command-line, you can append them as additional arguments to
--AiExtension.model_parameters, as shown below.
jupyter lab \
--AiExtension.model_parameters bedrock:ai21.j2-mid-v1='{"model_kwargs":{"maxTokens":200}}' \
--AiExtension.model_parameters anthropic:claude-2='{"max_tokens":1024,"temperature":0.9}'
However, for more complex configuration, we highly recommend that you specify this in a dedicated configuration file. We will describe how to do so in the following section.
Configuring as a config file#
This configuration can also be specified in a config file in json format.
Here is an example for configuring the bedrock provider for ai21.j2-mid-v1
model.
{
    "AiExtension": {
        "model_parameters": {
            "bedrock:ai21.j2-mid-v1": {
                "model_kwargs": {
                    "maxTokens": 200
                }
            }
        }
    }
}
There are several ways to specify JupyterLab to pick this config.
The first option is to save this config in a file and specifying the filepath at startup using the --config or -c option.
jupyter lab --config <config-file-path>
The second option is to drop it in a location that JupyterLab scans for configuration files.
The file should be named jupyter_jupyter_ai_config.json in this case. You can find these paths by running jupyter --paths
command, and picking one of the paths from the config section.
Here is an example of running the jupyter --paths command.
(jupyter-ai-lab4) ➜ jupyter --paths
config:
    /opt/anaconda3/envs/jupyter-ai-lab4/etc/jupyter
    /Users/3coins/.jupyter
    /Users/3coins/.local/etc/jupyter
    /usr/3coins/etc/jupyter
    /etc/jupyter
data:
    /opt/anaconda3/envs/jupyter-ai-lab4/share/jupyter
    /Users/3coins/Library/Jupyter
    /Users/3coins/.local/share/jupyter
    /usr/local/share/jupyter
    /usr/share/jupyter
runtime:
    /Users/3coins/Library/Jupyter/runtime